![]()
How to Charge an RV Battery? [Your Options]
DISCLAIMER: AS AN AMAZON ASSOCIATE I EARN FROM QUALIFYING PURCHASES. THIS POST CONTAINS AFFILIATE LINKS THAT WILL REWARD ME MONETARILY OR OTHERWISE WHEN YOU USE THEM TO MAKE QUALIFYING PURCHASES. FOR MORE INFORMATION, PLEASE READ MY EARNINGS DISCLAIMER.
|
There are a variety of ways to charge your RV’s house batteries, from shore power, to the generator and solar panels or wind turbines. Batteries could also be charged while driving by the alternator of the vehicle. Charging an RV battery should be done in stages with a good-quality charger.
The batteries charge when your RV is plugged into an electrical socket. Every modern RV is equipped with a converter-charger, which transforms grid electricity into 12-volt DC and then routes it to the adaptor.
A converter (which takes AC power and transforms it to DC power), is typically used to charge an RV battery. When your motorhome is going down the road, the batteries can be charged as well.
Proper battery charging should be done in steps (or stages). Many chargers or converter-charger offer a three-stage charging process and some even offer 4-stage. These stages are called:
- Bulk
- Absorption
- Maintenance
During the bulk charging stage, the voltage increases slowly and this is where most of the charging is made. When it gets to an absorption stage, the current reduces and the battery is charged to 90-95% of its capacity.
While in the maintenance stage, the charger will top off your battery and keep it at 100% level. RV house batteries can be charged in a variety of ways and that includes shore power, a vehicle’s alternator, a generator, a solar panel, and even wind power.
Now, let’s look at our charging options:
Shore power
When your RV is plugged into the power pole at a campground, the batteries will immediately start charging through your convertor. Many campers after boondocking for many days and exhausting their batteries, go to RV campgrounds to recharge their batteries.
Your power choices will be similar to this:
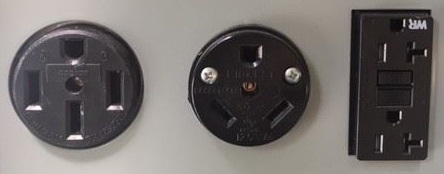
The converter
At the campsite, you will usually find 30 or 50-amp designated outlets for your camper. You can also use a 15 or 20-amp power outlet at your house to plug your RV in, but you will require an adapter in most cases.
The shore hook-up or home hook-up is powered by the electrical grid and some people install an electrical outlet for their specific type of service in their homes. It is convenient for packing your RV before the trip and it will also charge your house battery.
As soon as the connection with the electrical grid is established, the converter gets kicked in and starts charging your batteries. The best part about charging your batteries this way is that you can be running your electrical appliances at the same time.
Power is routed to the converter, which then distributes it to the 12-volt appliances and your 12-volt battery bank. The AC outlets are connected to the 120-volt breaker panel which is powered by shore power as well, while DC appliances are connected to the 12-volt fuse panel.
Using an onboard converter charger is the simplest method of charging RV batteries, but not the fastest and requires watching a battery monitor (to make sure you don’t overcharge them).
Depending on the model, the converter-charger can deplete the cells’ electrolyte levels, and therefore reduce battery life. Converters in newer RVs come with a three or four-stage charging process and if you are constantly hooked up to shore power, you may need to start looking into upgrading your converter.
Here is a good three-stage converter from Power Max (paid link):

Checking the electrolyte level at least once a month is a good idea if you are NOT using a sealed battery or Lithium-Ion. If the electrolyte level is low, just top it off with distilled water (not tap). It is also a good idea not to mount your batteries onto a metal base in case it boils and overflows.
Generators
Using a generator is another popular method of charging batteries. Your generator can be either installed by the manufacturer or portable:
Onboard generator
A motorhome’s factory-installed generator is usually connected to an ON/OFF switch within the rig’s cabin. It gets connected to an onboard converter (charger) and 120-volt appliances.
The onboard generator powers your RV in exactly the same way as the shore power would. The converter-charger, in its turn, charges your batteries and runs your 12-volt devices (lights, fans, pumps, etc.)
Onboard generators will run as long as you have fuel in the main tanks. When 1/4 of the fuel in the tank is left, it will shut off. This gives you an opportunity to still use your vehicle and get to the gas station!
Portable generator
There is a wonderful variety of portable generators available for your RV, in case you do not have one built-in! The only limitation of this generator is how many devices you can run at the same time and for how long.
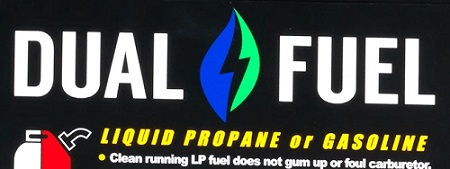
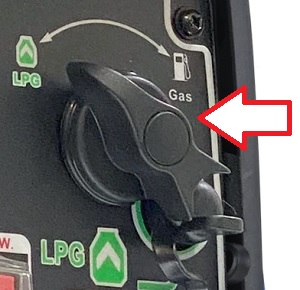
Portable generators need to be refueled. They can either be connected to the propane tank or refilled with gas. Some generators offer both options and can do both (depending on what kind of fuel you have available):
In this case, there will be a switch :
With portable generators, you have quite a few options on how to charge a battery:
- You can plug in an electrical service cable and the onboard converter will start charging it.
- You can use 12-volt charging posts for the generator and the generator company should provide you with cables.
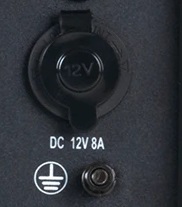
- You can use a 12-volt outlet of the generator and here is the cable you can use (paid link) to connect it.
- You can use a smart multi-stage charger (best option) and plug it into a regular 120-volt outlet of the generator.
The simplest way to charge your battery with a generator is:
Just plug in your 30-amp or 50-amp cord!
If your generator does not provide the proper outlet, use an adapter. Try not to overload the generator and your batteries will be charging the normal way.
Some generators come with 12-volt battery charging posts:

Some come with a 12-volt DC outlet:
You can easily overcharge your battery with these two options (via charging posts or a 12-volt outlet with the dc charging cables) because there is no sensor there and it will not shut off the power when they are full. On the other hand, a 25-amp smart charger (or multi-stage charger) is a much better option since the battery will be charged in the proper way and it will NOT overcharge it.
Even though it is not recommended, charges offer the ability to charge the battery faster. This excellent battery charger/engine starter from Schumacher (paid link) can be used for standard battery types, AGM, Gel, and deep cycle (not li-ion):

The battery charger/disulfator from NOCO GENIUS10 (paid link), can charge your lithium-ion batteries as well:

Alternator
Many RVs are wired in such ways that your engine’s alternator will charge both (chassis and coach) batteries while you drive your vehicle. This is very practical if you are traveling down the road frequently.
Mechanical energy is converted into electrical energy by an alternator and it could be used for charging your house battery. Some trailers are also wired to receive a modest charge from the tow vehicle, but the wire gauge is so small, that it will only be a trickle charge.
NOT all RVs are wired to charge your house battery from the alternator, so check your owner’s manuals and other documents.
In normal cases, your alternator is ONLY set up to charge your vehicle (or chassis) battery and you will need some kind of extra device to charge your house battery (more explanation in this article).
There are a couple of methods of charging your coach battery with the alternator. Both mentioned methods below do require you to keep an eye on your batteries in order not to overcharge them, so be careful.
Eco charge from Xantrex (paid link) will transfer a portion of the charging current from the chassis battery to the house battery bank:

You can also use DC to DC professional smart charger and my favorite model is from Victron (paid link):

Here is a good explanation of your alternator wiring options:

An alternator is a terrific way to charge your batteries if you are on the road for a long time, but it’s not a good idea if you primarily spend your time at one campsite. In this case, to charge your batteries, you’d have to idle your car, which is inefficient.
Solar power
Utilizing the awesome power of the sun is a good idea if you are planning to spend a significant amount of time off the grid. You can either install solar panels on your RV’s roof permanently or use portable solar panels that you can place in the sun.
Some people use both to increase their solar capacity (if they run out of roof space ????). Solar is a game-changer for many RVers:
As long as there is sun, you will always have electrical power at your service!
A solar system collects solar energy and stores it in the coach (or house) batteries. It’s a whole system that needs to be installed properly and it consists of:
- Photovoltaic panels
- Charge controller
- Battery bank
- Inverter
- Battery monitor (optional)
The solar charge controller will prevent your batteries from getting overcharged and the inverter will take that DC (Direct Current) power and convert it to AC (Alternating Current) that you could use for 120-volt appliances.
Here is one of the best solar charge controllers out there – Victron Energy SmartSolar (paid link):

You can also install a battery monitor to know exactly how much energy your batteries have and how much is being utilized. Some monitors even allow this information to be accessed via phone app.
Here is a smart battery monitor from Victron (paid link):

Even though a charge controller will not let your batteries overcharge, you can use this monitor to make sure that you don’t deplete your batteries too low. This is especially important for flooded lead-acid batteries. If they go down to more than 50% of their rated capacity, severe damage to the battery can occur.
Make sure you get a monitor with an LCD screen and not one that shows your battery status in increments. It is a good investment to keep track of your batteries at all times. You may also want to get a consultation with a specialist who will help you with selecting the right solar system arrangement for your camper.
Wind turbines
For charging your batteries with wind turbines, you will need pretty much the same accessories just like the solar panels, only an actual wind turbine instead of photovoltaic panels:
- Wind Turbine
- Charge controller
- Battery bank
- Inverter
- Battery monitor (optional)
Wind turbines are a great supplement to solar panels because they work during the storm better. However, the wind is unpredictable and there are some complications along the way (cons):
1. No wind, no electricity
If this is your primary electricity source, you could be in trouble if the wind is not blowing! RV wind turbines can start generating power in winds as low as 10 mph, but only around 40 watts.
In order for your wind generator to reach its maximum potential, you will need winds of approximately 20-30 mph and that is equivalent to about a “strong breeze” mentioned below:
| MPH | M/S | Wind Type |
| Less than 1 | 0 | Calm |
| 1 – 3 | 0.5 – 1.5 | Light air |
| 4 – 7 | 2 – 3 | Light breeze |
| 8 – 12 | 3.5 – 5 | Gentle breeze (leaves move) |
| 13 – 18 | 5.5 – 8 | Moderate breeze (small branches break) |
| 19 – 24 | 8.5 – 10.5 | Fresh breeze (small trees sway) |
| 25 – 31 | 11 – 13.5 | Strong breeze (large branches sway) |
| 32 – 38 | 14 – 16.5 | Moderate gale (large trees sway) |
| 39 – 46 | 17 – 20 | Fresh gale (twigs are broken) |
| 47 – 54 | 20.5 – 23.5 | Strong gale (slight damage to trees) |
| 55 – 63 | 24 – 27.5 | Whole gale (trees uprooted) |
| 64 – 73 | 28 – 31.5 | Storm (blown roofs, destroyed houses) |
| over 73 | over 32 | Hurricane (everything around is destroyed) |
This is why using a battery bank with a wind generator turbine is very important! The normal wind is simply NOT enough to use your turbine to power an RV without the help of house batteries.
Unfortunately, a good camping experience is usually not associated with bad weather and heavy wind. Another obstacle is that just like any good captain:

You need to make sure your wind turbine is actually facing the wind!
2. Not enough electricity
Wind turbines need an adequate amount of wind to generate power. If you don’t get enough wind, your turbine will only operate at about 30% of its total capacity.
So, how much does wind generate?
| Wind Speed | Power |
| 5 (m/sec) | 58 watts |
| 8 (m/sec) | 234 watts |
| 10 (m/sec) | 466 watts |
| 12 (m/sec) | 805 watts |
| 14 (m/sec) | 1278 watts |
| 16 (m/sec) | 1910 watts |
| 18 (m/sec) | 2720 watts |
| 20 (m/sec) | 3720 watts |
** These numbers are approximate!
Wind turbines also have a feature called “cut speed”. This means that if it starts running at speeds that it was not designed for, the power will be cut to avoid damage.
3. It’s a hassle to setup
Every time you change camping places, you will need to assemble and disassemble your turbine! Do you really want to do that?
What if you want to go grocery shopping? Well, you will need to assemble and disassemble again.
Some people wonder if they can use all the wind they are getting from driving a vehicle.
You really cannot drive while using your wind turbine due to safety reasons and the inefficiency of power production.
Generating electricity with the alternator is far more efficient and less fuel will be used since the turbine itself can create resistance. Not to mention it can break if not mounted properly!
These are small turbines and they cannot handle a lot of stress… Hight clearance of bridges and tunnels will start being a big concern to you as well.
Although if you stay in one spot most of the time, and there is enough wind in the air, wind turbines could be a great solution for you.
4. You become a lightning rod!
Wind turbines need to be raised really high in the air to be useful, but this is also how your RV can become more vulnerable to a lightning strike! These things have a tendency to attract lightning and can be damaged really badly if it happens.
I am not even talking about what can happen to your RV in this situation…
Battery charging capabilities
If you like to take many boondocking or dry camping trips, you may want to invest in a good set of deep-cycle batteries. They can be either Lead Acid or Lithium-ion. All batteries require some kind of maintenance to be done, but lithium-ion batteries are the easiest ones to take care of.
Here is a lead-acid deep cycle battery 100AH from PowerStar (paid link):

And a lithium-ion deep cycle battery 100AH from PowerTex (paid link):

100AH to 200AH batteries work best for the RV’s battery bank. A good deep-cycle battery will allow you to almost fully discharge your battery (50% to 80% is commonly recommended by the manufacturer).
Regular (NOT deep cycle) batteries can only be used halfway before it is necessary to recharge them. If you go over that, the batteries will be damaged.
Different battery chemistry allows a different amount of maximum amps per certain % of their capacity. For example:
- Wet (of Flooded) battery – 25% at a maximum rate (temperature-compensated charging is advised).
- Gel battery – 30% at a maximum rate (requires temperature-compensated charging).
- AGM battery – 40% at a maximum rate (requires temperature-compensated charging).
- Lithium-ion batteries – have the fastest recharge rate.

You can also search our database:
Attention! This article is for informational purposes ONLY and is NOT a replacement for professional advice! ALWAYS consult your local specialist for an appropriate solution to your problem. All statements, prices, contact information, recommendations, and reviews contained herein came from sources that we believe to be reliable, but the accuracy or completeness thereof is not guaranteed. Please contact the service provider for complete details and updates.