
![]()
How to Wire a Solenoid Switch [4-Pole Starter]
DISCLAIMER: AS AN AMAZON ASSOCIATE I EARN FROM QUALIFYING PURCHASES. THIS POST CONTAINS AFFILIATE LINKS THAT WILL REWARD ME MONETARILY OR OTHERWISE WHEN YOU USE THEM TO MAKE QUALIFYING PURCHASES. FOR MORE INFORMATION, PLEASE READ MY EARNINGS DISCLAIMER. |
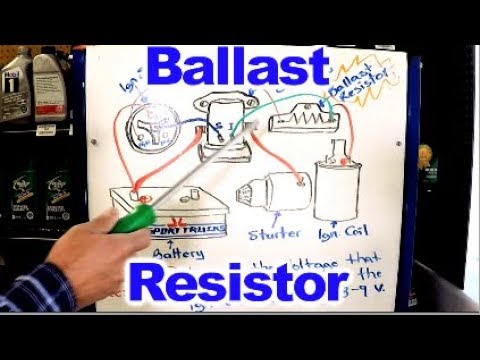
This is how a 4-pole starter solenoid switch is connected. One of the larger terminals is connected to the hot wire coming from the battery, the second large terminal is connected to the starter, the first smaller terminal (S) connects to the ignition switch, the second small terminal connects to either ballast resistor (R) or ignition coil (I) and is generally unused. Make sure to ground the frame.
Solenoids provide a safe and easy way of activating and deactivating any kind of electrical ON and OFF components. They allow to activate high current circuits and manage them by switching on two contacts that need considerably less power to be activated than the current that the solenoid is going to handle.
When a small current is applied to a solenoid, a coil located inside generates a magnetic field that moves a plunger that drives the high current switch to the closed position. Please watch this video for more detailed information on 4-pole solenoid wiring (schematics):
Get a hands-on experience with 4-pole solenoid wiring in this video:

Wiring process of solenoids
A starter solenoid usually has four terminals: two terminals are used for the high current circuit and the other two are the low current terminals of the solenoid, which are connected to the inner coil, and are the ones that trigger the high current device on the high power end.

Four connectors in a solenoid generally include:
- 2 small connectors for the solenoid switch
- 2 thicker and bigger connectors for the high-current switch
Assuming that you are going to perform this wiring in a car, you are probably going to use a 12V battery. By convention, it’s advised that you use black wire for negative and red wires for positive.

If you want, you can use brown or orange cables on the high-current end of the circuit, to distinguish them from the solenoid to battery connections. The color of those wires will depend on whether you are switching ON and OFF the negative or the positive cable of the device that you are going to handle with the solenoid.
Below you will find a simple schematic that will show you how to wire a solenoid switch to any device that you need. It’s a very simple job as you can see:

Final thoughts
Solenoids are very practical devices for automation. Another advantage of solenoids is that the elements that they handle don’t have to be in the same circuit. That’s why solenoids are very reliable and relatively simple forms of actuators and their use is very common in different fields of electricity and electronics.
Feel free to save the infoPin below for your future Reference :
Find a mechanic near you to wire your solenoid switch:
Attention! This article is for informational purposes ONLY and is NOT a replacement for professional advice! ALWAYS consult your local specialist for an appropriate solution to your problem. All statements, prices, contact information, recommendations, and reviews contained herein came from sources that we believe to be reliable, but the accuracy or completeness thereof is not guaranteed. Please contact the service provider for complete details and updates.


If the solenoid relay goes out will the truck start or vehicle start
Hi Roger, if the solenoid relay goes out, the vehicle or truck won’t start. In the case of the 4 pole starter, the solenoid must be grounded to the case to be able to work, and on other starters, the starter solenoid has a rod that probably will detach too, preventing to do its job.
I get a spark from positive and negative on solenoid but little or none when touching the yellow wire to the positive terminal
Hi Jerry, if you have it wired like it’s displayed on the video, the yellow wire is coming from the ignition switch, it’s an “input”. Please tell me more if you want so I can help you.
David